Tess, time to get dressed

Several (four-five?) years before first flight, I met this little guy named Jonathan McCormick who has a scheme design and paint business in Alabama. Plane Schemer and Evoke Aviation are his life’s work and they are simply put amazing. Here’s a brief story of how we got Tess all dolled up.

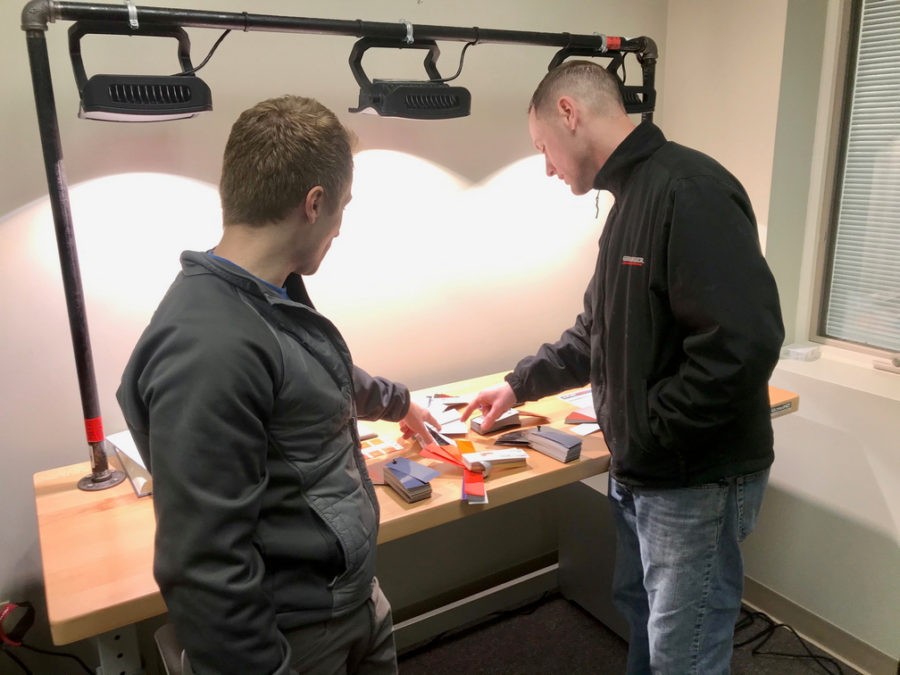
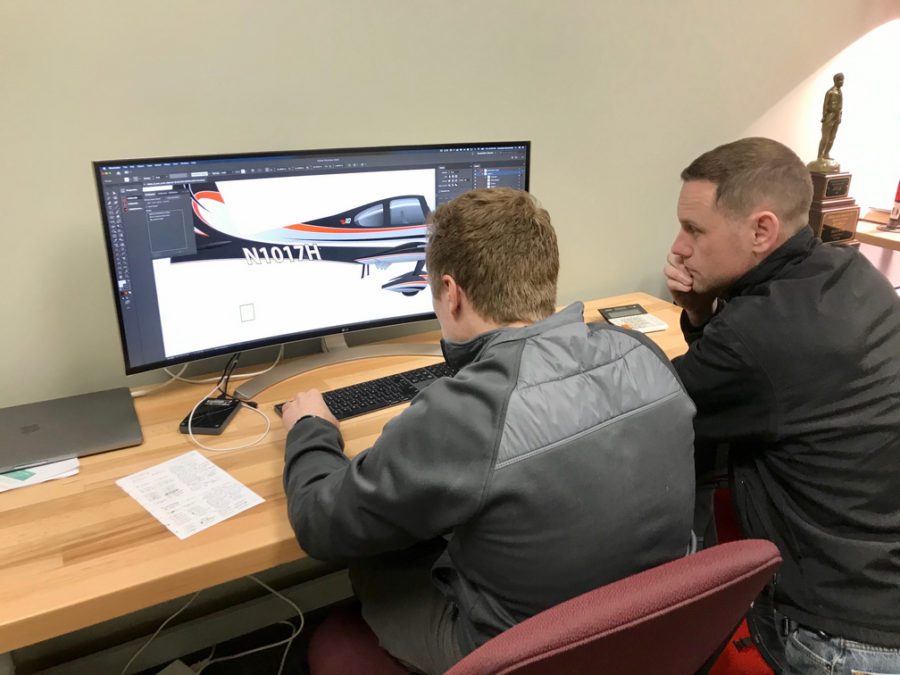
I met Jonathan at Sun N Fun in 2015 and got to work with him on designing a scheme. I was early in the build but wanted to have some motivation and vision on what we were putting together in the garage. He was great to work with for a reasonable fee and didn’t stop until I gave the final approval on every little detail. We started with some inspiration photos that I sent him and some descriptions of each aspect that I like and wanted to incorporate. He then took this and put his artistic skills to work creating a truely unique and exiting paint scheme.

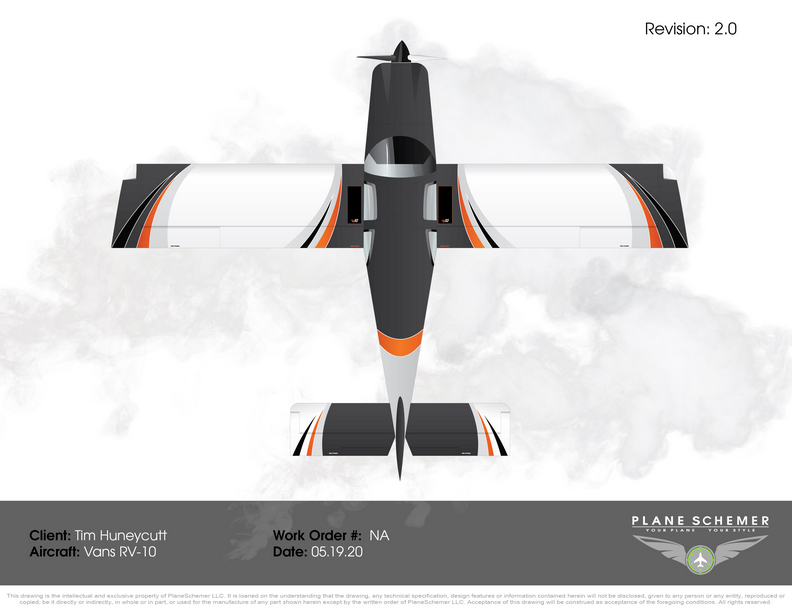
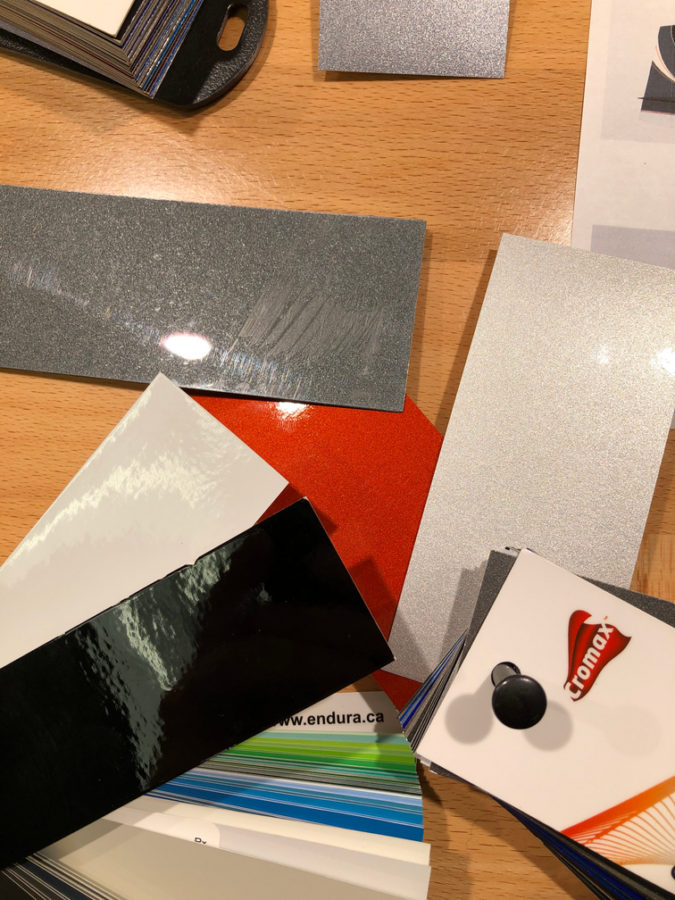
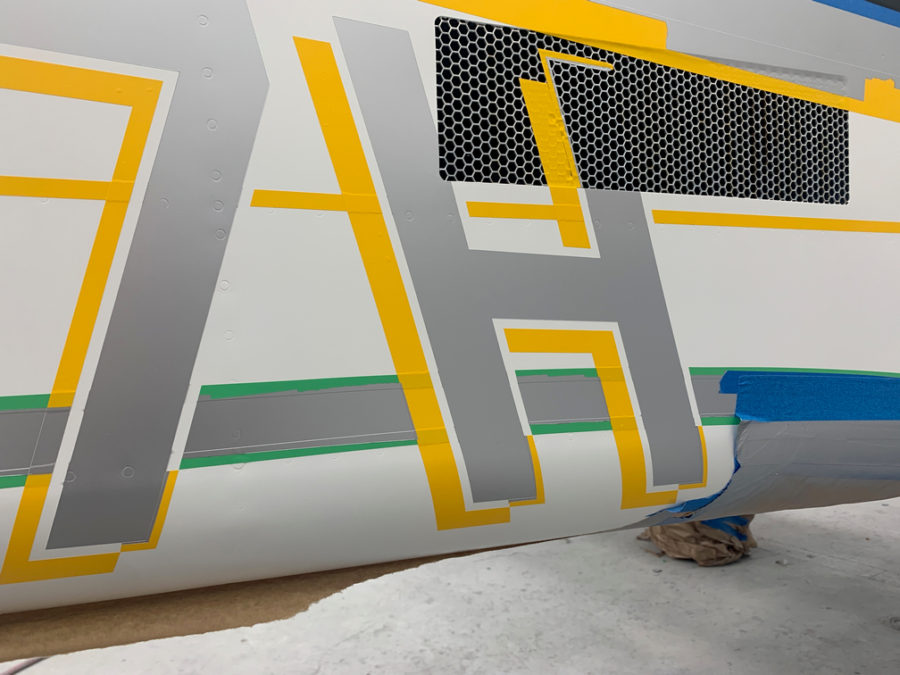
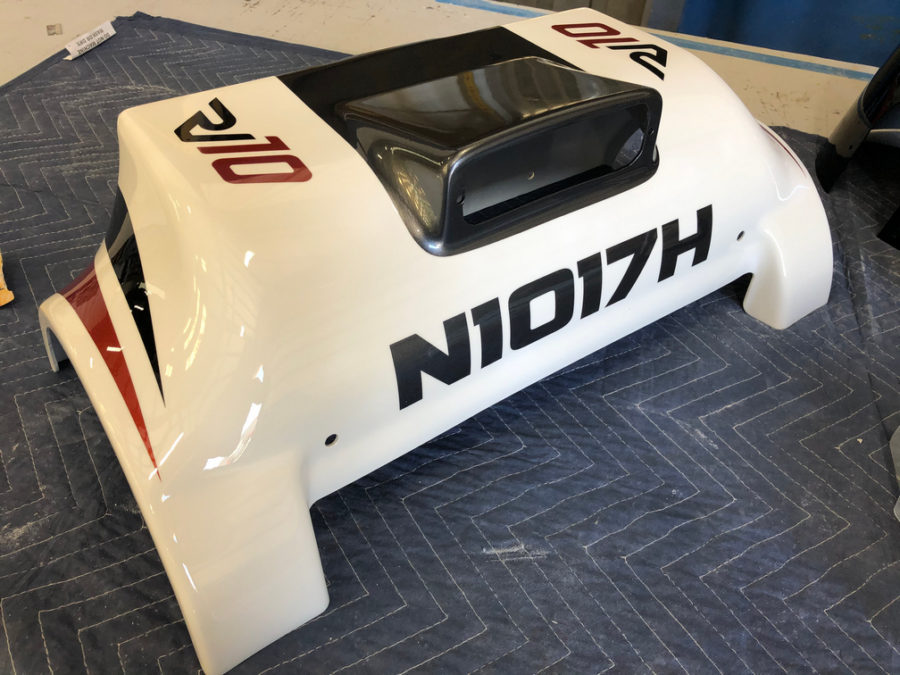
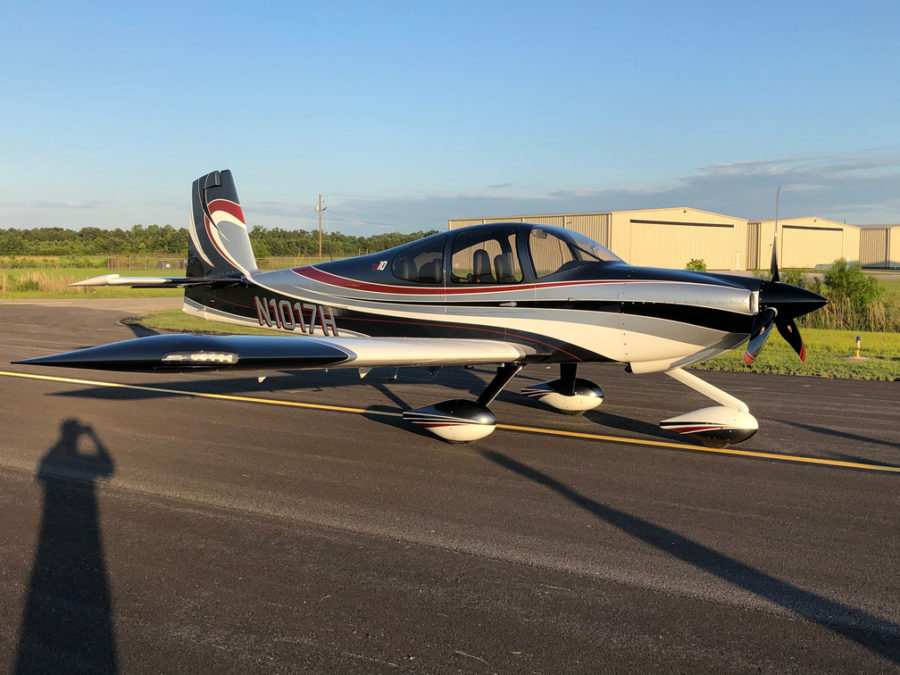
We wanted something no one else had and something different than a typical cheat line or a few swooshes. My main inspiration came from another RV, this one having 8 wheels and two slide outs used on the road. He really nailed the design with the tail and the whole scheme grew from that feature. Laura loves orange, and it’s high on my list of favorites, so we decided that would be the splash of color in the scheme. We went back and forth with a few things, lines here, swooshes there, wheel pants reversed, etc. When it was all said and done, we had a one of a kind paint scheme that was going to be a head turner. I also had motivation to stop cruising the internet for plane pictures and finish building.

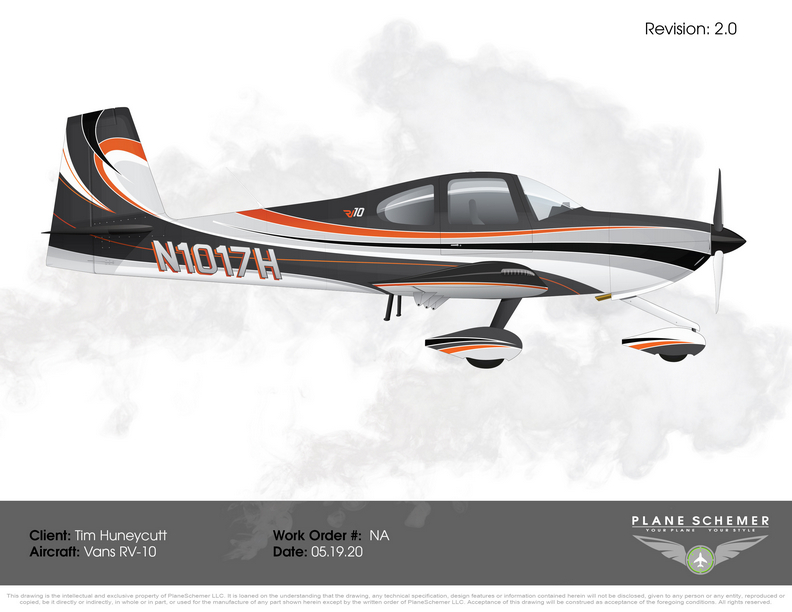
But wait, there’s more! Sam, Jonathan’s girlfriend and business partner, has a side business creating custom artwork. Laura and I wanted a little logo we could use for the plane, shirts, cups, seats (didn’t get to put it on the seats), pillows, basically anything that can be embroidered! She and I worked together to create a custom logo for the plane and I couldn’t be happier with the result. We will incorporate that into the paint as well as all kinds of fun stuff. I do politely ask that our logo not be copied, as Sam earned a commission on this artwork and Laura and I would like to keep this unique to our plane.

Please do not copy.

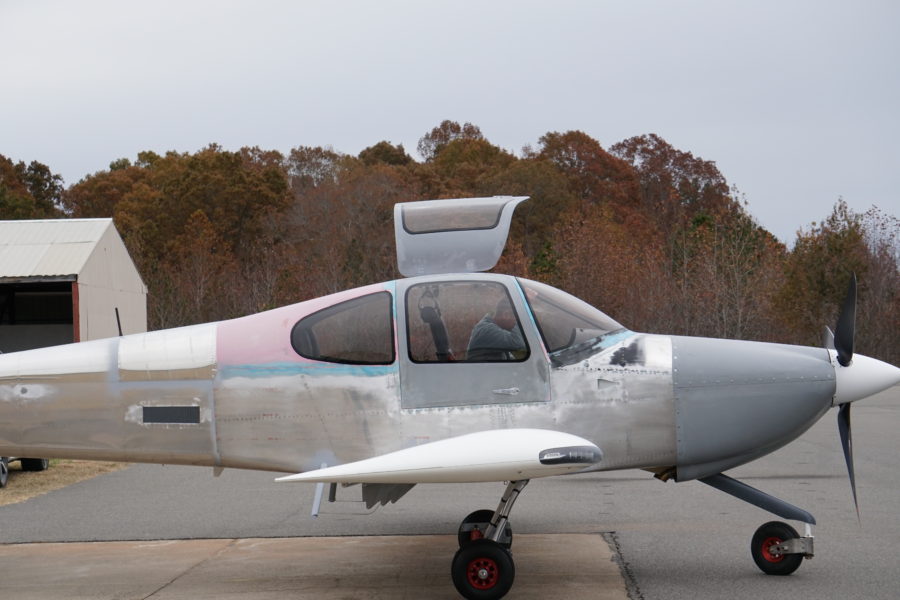
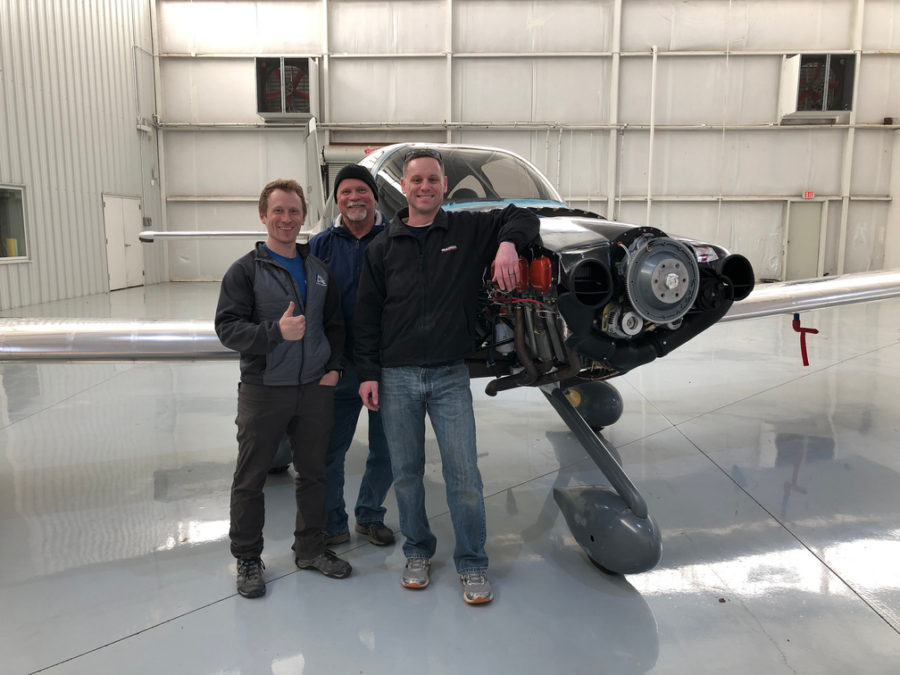
Fast forward a few years and airshows later with a random meeting in Raleigh NC on the ramp, I reached out to Jonathan about getting a slot for painting the plane. He and I agreed it’s best to paint after flight tests, as stuff comes on and off a lot plus a few adjustments can be made without messing up the paint. In March of 2020, I flew Tess down to Gadsden, AL (KGAD) airport to drop her off for paint. Jonathan and I spent the morning doing a tour of his two facilities, checking out other projects, and poking our heads into warbird jet projects on the field. He also finalized the actual colors in his office and did just a few tweaks on the scheme after having a few years and hundreds of other designs now under his belt.

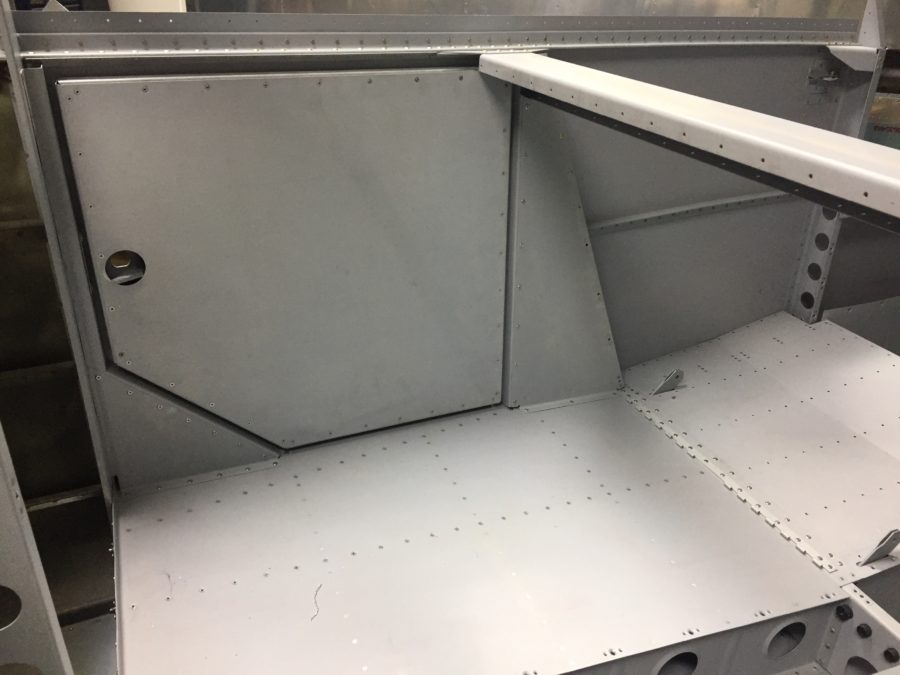
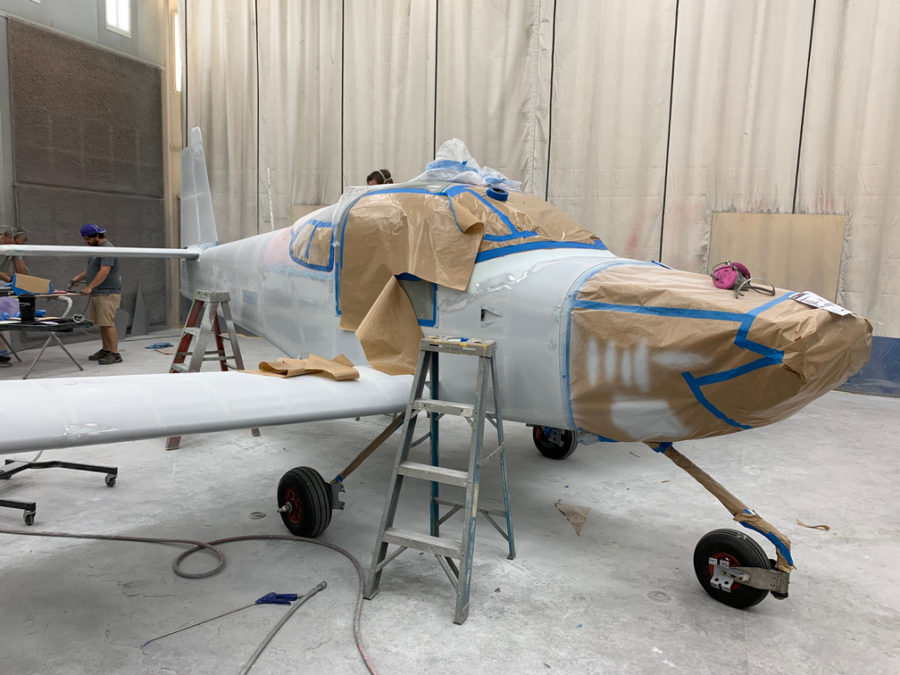
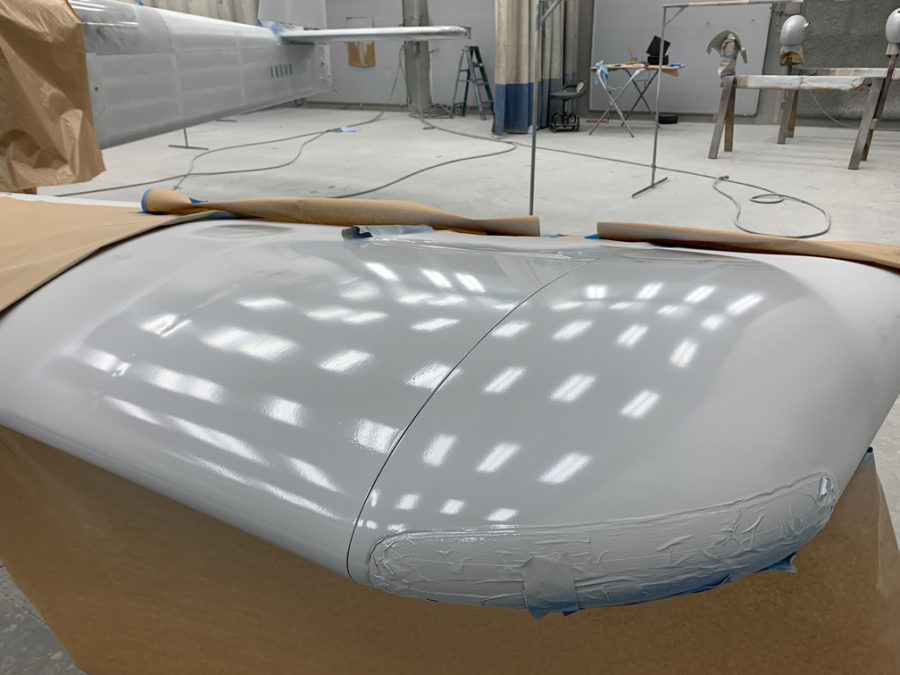
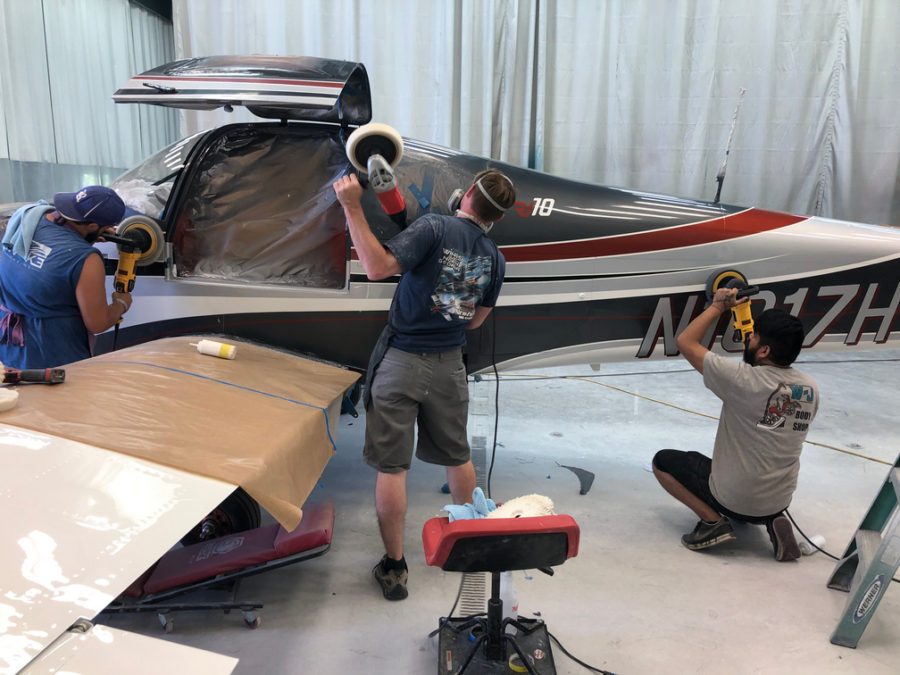
I left knowing it’d be a few months before it’s all finished up and let him and his team go to work. This website doesn’t have room to describe all the work they did! It does have room to say how good the work was! Wow, they dove in deep and with a vengeance for perfection. All of my stupid little new builder mess ups were corrected, they smoothed and perfected the fit of the wingtips which needed a lot of work, and they did an amazing job prepping each and every surface for a perfect paint job. The amount of filling and sanding was mind blowing to me even after I thought I had done a decent job of prepping. With the amount of colors and layout of the scheme, it was also a ton of work to get the color on the airplane. I still can’t figure out which order they put the colors on but the results were mind blowing. With the status pictures coming in with all the color on, I thought we were close to the finish line, but that’s where even more work comes in. They wet sanded the entire airplane, knocking each line down between colors and eliminating all waves, orange peel, and imperfections. Then, they cleared the entire plane. One smooth consistent surface makes a massive difference on the quality and longevity of the paint job. Buffing and touch-ups were next and then I got to come down and help put it back together. We finished the windows with sealant filling the troughs in around the edges and a protective bead on the bottom of the windshield. The guys were great hosts, taught me a few things, gave me a lot of help, and lots of new shiny stainless steel hardware!

Even our tug got a cool paint job from a new painter learning his skills. Honestly, the tug gets more comments than the plan does at home!

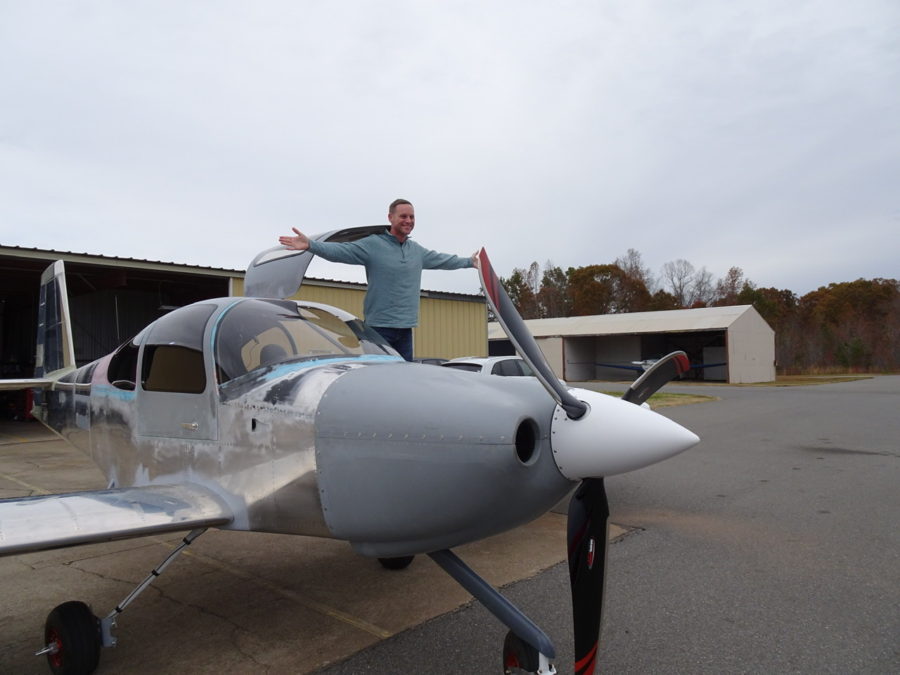
After several agonizing months without a plane, we rolled Tess out into the evening sun for a photo shoot on the taxi way. I was drooling the entire time! To say I’m happy is a massive understatement and the feedback from others is the same. Even after a year of flying and a few scratches, sorry Jonathan, I still get people coming up to it everywhere I go commenting on the paint.

So, the nitty gritty of it all. It was expensive. Really expensive. It took a long time. A lot longer than I was told originally and was expecting. It is better than I could have ever imagined. It is worth twice what we paid for it. I’m realizing that even more with fellow builders struggling with paint quality issues. I have and will continue to recommend Evoke and the team of professionals to everyone because they doe the job right the first time.

Jonathan, you took our baby girl and made her beautiful. Thank you!

Up, up, and away!

Since I now have an airplane, the next logical step is to fly it right? Kick the tires and light the fires! Dad, Laura, and I celebrated the certificate with a nice dinner full of phone calls and texts from friends, family, and well wishers. This community is simply amazing. So many people congratulating us on our accomplishment like we are old friends. Some we haven’t even met in person!

Mark Ciaglia and Charlie Derk have especially been motivators to me. Mainly, I want to build a better plane than both of those losers and no doubt I have. We have a group text running back years at this point full of questions, this is what I did, that’s stupid I’d never do it that way, and remind me never to fly in (fill in the blank)’s plane. Seriously though, these guys have been such a rock to lean on for advice, ideas, encouragement, and comradery. They both have amazing RV-10s in the works and no doubt will be amazing accomplishments. Anyway, not to get too sappy, we received an awesome gift in the mail that required a signature with a note that only Mark and Charlie could come up with. Thanks guys, I hate you too.

Dad and I put everything back together on the plane the next day with gloomy skies preventing the temptation of first flight. We spent some time going over the plane again just to quadruple check everything. I also gave dad his first ride in the plane when I towed it down to the compass rose to calibrate the ADAHRS and magnetometer. He did great and didn’t even get sick. Something tells me the 20-something-thousand hours as a pilot contributed to his courage and brake-riding expertise! When we ran out of things to check, we called it a day and put her to bed one last time before she flies.

Friday, November 15th dawned with partly cloudy skies and light winds with a small chance for isolated showers. The weather was good, the plane was ready, and I was out of excuses. So my ground crew consisting of Dad, Laura, and Parish all headed towards the hangar ready to fly. Laura set up the camera as Dad and Parish established comms with a handheld radio and took up station next to the runway. I did another pre-flight inspection and had some solo time with the plane before strapping in.

Using the EAA test flight cards, the first flight is all about ensuring the plane flies well and beginning to break in the engine. Keep the power above 80%, keep the temps as low as possible, and stay within gliding distance until confident there’s no big issues. Dad and I worked out a plan for me to take off and orbit the pattern at 3000′ while shaking down the plane and engine. If any issues popped up, I’d land. If I felt good, I’d head towards KEHO then to KHKY and return back to KIPJ after an hour and a half. This provided good access to landing spots and kept me away from trouble like towers and mountains. Vic assigned a 100 NM radius test area so I had plenty of room. Coming back home, I’d do a practice approach at 2000′ testing flaps then land on the second approach.

So, I strapped into Tess, patted her on the glare shield and cranked her up. A long taxi to the south end of the field and a salute from Dad helped me get all the nerves out before doing my runup and entering the runway. Check out the videos for takeoff and landing below and excuse the childlike squeals and giggles (and language) from the pilot.

Needless to say I had the RV grin! Overall the flight went well. The plane handled beautifully and I felt that the flight was conducted in a safe manner. It was not squawk free, however! Fellow builders will understand that the excitement of success is quickly overwhelmed by the anxiety to fix issues. So here are my big take aways from the first flight:

  • Smoke in the cockpit!
  • Avionics calibration issues (fuel tanks and fuel computer)
  • Prop governor set to over-speed prop
  • Confusion on which radio is which thus transmitting on wrong frequency
  • Transponder/GPS traffic configuration caused countless TRAFFIC annunciations

Highlighting the important things, the engine ran smoothly and man was it powerful! The temps all stayed below 400* which means that my hard work on baffles and plenum is paying dividends. It was fast! Much faster than I was expecting! Almost everything worked, or at least worked well enough!

The smoke was a huge Oh Shit moment for about a second or two but quickly mitigated itself. I’m sure others would disagree, but I decided to continue the flight because I was confident in what was causing it. When we purged the preservative oil out of the engine, I had not hooked up the scat tubing to the heat boxes or muffs. I had tried to soak up some oil from the heat muff but it’s hard to get a rag down in there. When I smelled the odor and noticed it didn’t continue, I put even more focus on the engine gauges and felt safe to keep flying.

The configuration issues will be sorted in time, although they are annoying, I’m not too worried about them. My biggest embarrasment was the audio panel and radio communication. With all of the playing and testing of things, I had it in my head that the AFS radio (integrated with the EFIS) was Comm 1 and the Avidyne GPS/VHF was Comm 2. Quite the opposite. Not being comfortable with button pushes and menus quite yet meant that I constantly transmitted on the wrong radio. CTAF was on Comm 1 and Dad was on Comm 2.

A huge thank you goes to every single person who has lent a hand, gave advise, answered a question, banged a rivet, help lifted something, and gotten dirty to enable me to achieve this dream. My biggest supporter, my wife, Laura, has been by me every day of this and I truly could not do it without her. I’m so glad my Dad could come up and be a part of this day, as it’s one of my proudest and to be able to share it with him, where my aviation passion stemmed from was icing on the cake.

Just to prove the landing was awesome, my Bianca Bro, Todd Kincer, caught the evidence from the ground. I’ll never make a better landing in the plane and that’s okay!

Let’s build an engine, eh?

Perhaps the biggest and most expensive decision in building a plane is what engine will be powering the hopes and dreams of the builder while turning many dollars of avgas into adventures.  Some may know that I’ve been involved with an alternate engine that has unfortunately not matured enough to be on my plane just yet.  I’ll detail that in a future post, but this one is all about the Lycoming!

The backstory to what impacted my decisions stems from my flying experience, goals and missions for our plane, and personal preference.  I knew that I wanted to start off with a completely new engine, no overhauled components.  That is not to say an overhauled or even factory 0 time (but not new) engine isn’t as good as being brand new.  I just want a fresh start and a foundation that I could overhaul in the future.  I also want an engine that is efficient and powerful.  I’m not interested in exceeding Vne or supercharging the thing to 1000 horsepower, but I do want something a little hot rodded above the stock 260 horsepower of an IO-540.  I also want it efficient, not only for mission range and cost, but to be somewhat green and environmentally friendly.  Afterall, trees need hugs too, right?  Most importantly, however, I wanted to have a modern engine or at least as modern as you can with a 1930’s tractor inspired design.  That meant electronic gizmos and a lot of them!

While researching new engines, the usual suppliers popped up.  Van’s will sell a crate engine with few if no modifications or choices available.  Lycoming will sell directly through Thunderbolt lines with some options available and even paint the engine a custom color as long as that color is red!  Barret Precision Engines can get a new crate engine or overhaul a used core to build essentially anything you want.  Lycon will put 54 to 1 compression pistons that require nuclear fuel to run and charge you the equivalent fee for it.  Numerous local shops can build from parts or rebuild a core engine.  Or you can simply purchase a running engine from a sellar and slap it on the plane.  For me, it came down to two vendors, Barret and Aero Sport Power.

Aero Sport Power is in Kamloops, BC and has been building experimental and certified engines for decades.  They have a great reputation with the aerobatic folks and have an entire business division to cater soley towards ameature built aircraft engines.  They also have a unique offering, a build school that is a three day course where you get to participate as much or little as desired in the build of your engine capped off with a first start and test run on their test stand.  Darren is a phenominal resource and will hand walk you through everything from figuring out which engine you actually need (IO-540-R2D2 hah!) all the way to which hotel is best to stay at in BC and how to run your new engine during the first few flights.  What I liked about Aero Sport the most is technical:  they are an authorized Lycoming builder that can order a new engine kit unassembled.  What that means is they build the engine to my specs, not take a crate engine and rip components off to replace with aftermarket upgrades.

So I called Darren and started talking about what I wanted.  Lycoming 540 with 9:1 compression, SDS dual ECU injection and ignition, BPE cold air induction, no mechanical fuel pump (not needed with SDS) dual groove flywheel for aircon, remote oil filter, 70 amp alternator with 30 amp back up, and of course custom paint scheme.  This all was an easy kill for Aero Sport who promptly gave me a quote and lead time.  They then put up with me asking questions, requesting information, putting the purchase off, and finally committing in January of this year with a July build date.  The price wasn’t the cheapest, but it also wasn’t the most expensive, apples to apples.  They were, though, the only shop who could build (not re-build) the exact engine I wanted.  The icing on the cake was the chance to come up and help build it! This is how excited I was!

With the deposit paid, planning began on keeping the copilot happy by having a vacation in conjunction with the build class.  We worked out flying into Calgary and taking our time traveling west over the mountains to Banff then to Kamloops before spending a few days backpack camping back in Yoho then flying home.  To top it off, my dad and step mom had a similar idea, taking a cross country train from Toronto to Vancouver then meeting us in Kamloops so pops and I could build the engine father/son.  I won’t get into all of the vacation details, but we now have free tickets from American thanks to our luggage traveling halfway around the country before making it to our hands on day three of the trip.  We traded the backpack camping for day hiking and an Air BnB with a hot tub due to snow and head colds and came home happy!

The summary for builders is take a lot of time and research the build shop you want.  Build the engine like you build your plane, just the way you want it.  Need to save money?  Do it.  Want the bling?  Chrome everything.  More power?  Do it.  Your life and the lives of your passengers depend on your powerplant more than any other component so make sure you are comfortable with your engine and are happy with your decision.  I’d be happy to talk with anyone about the finances and other small decisions to help a fellow builder.

Stay tuned for the build school write up.

The art of design

If you aren’t building, you probably don’t care about this article regarding how and why I laid out my instrument panel the way I did.  For those of you that are building, be my guest and read on.

I have spent many Air Ventures looking and playing with avionics and decided some time ago that AFS was my favorite.  I don’t have anything against others, but the layout, functionality, and features of the AFS just fit perfectly for me and my flying mission.  I’m going to fly a lot of IFR with my airplane, as I already do with the Diamond so want a very capable suite of avionics up front.  I also don’t want to upgrade or add on for a very long time so I budgeted to do everything I wanted upfront.

A quick run down of the panel includes:

Two 10″ PFD touch screens

One 12″ MFD touch screen

Dual ADAHRS

IFD 540

Garmin G5 as backup instrument

XM radio and WX

ADSB in and out

Oxygen control head for MH 4iP

A/C control head

Space for SDS control head

Toggle switches and rheostats all matching

All controls that I need located to the left of the center console – no reaching over my pax!  Now, my wife is not a pilot and doesn’t really need the PFD in front of her, but we both like her to be situationally aware and I fly with other buddies that will appreciate a PFD on their side.  It also allows me to one day teach someone else to fly easier.  Again, I don’t want to have to put the airplane down for an upgrade later.  Do it right the first time.

The big pieces go in rather quickly as there aren’t many options of where to put them.  My main concerns were what switches go where and how to get a good flow on the order of switch groupings.  I also was determined to create a back light setup for the switches much like Ed Krantz did on his plane.  More on this later.

With the main components located, I decided on all lighting switches and dimmers to be located on the overhead console.  The upper left has the “misfit” switches like defrost, pitot heat, oil cooler, etc.  The main switch panel in front of me will have master switches and all engine controls in order of startup procedures.  Finally, the lower console will have the O2 and cabin climate controls where either left or right seat occupant can easily control them.

The space for the SDS control head is not ideal, but that instrument, should I go with SDS, is really only used during testing and tuning.  The EFIS will display all engine parameters for normal operations and I haven’t even decided if I’ll mount the display on the panel or remote mount it for use only when I need it.

I do a lot of night flying and despise red dome lights or using a flashlight.  While all three screens and the GPS will put out a good amount of ambient glow, I wanted the switches to be properly backlit to add that extra pop to the panel.  While playing around on the internet looking for lighting solutions, I came across electroluminecsent or EL panels.  They are a really neat product, only about 1/32″ thick and available in many different sizes which are then trimmable with a few restrictions.  All run off of a 12V transformer and provide equal, dimmable, light across the entire surface.  Perfect for what I was wanting!

I ordered a test piece to experiment with in the shop and requested a sample of engraved acrylic from Aircraft Engravers.  Match made in heaven.  The EL panel glows nicely through the laser engraved markings and can be cut, trimmed, and hole punched for all of the switches and dimmers that need to go into the panels.  The transformer makes a bit of high pitch whine, but it will be drowned out in the airplane and a few flight tests in the Diamond confirmed that the transformer was not electronically noisy, only audibly so.

With a successful experiment, I set back to work in Draftsight to come up with templates to be cut and engraved by Aircraft Engravers.  AFS, who is building my panel, will still cut, paint, and label the four main panels.  This will be a presentable back up in case my EL project doesn’t work out in the long run.  I worked with an EL supplier from Etsy who has been awesome to get a proper prototype panel cut for the overhead console.  There are some limitations with the EL panels such as the power lead locations and two edges that have the contacts running along them not being able to be cut.  It was a bit of puzzle work, but in the end fairly simple to draft up and layout.  Aircraft Engravers cut and engraved the acrylic overlay for the overhead console panel and I was able to put it all together with switches to see how it looked.

I was so excited that I forget to specify which color, so Marc sent white.  No worries, as the production version will be a blue.  Needless to say, I spent a lot of time sitting in the dark garage flipping switches that weren’t wired to anything!  It’s a very elegant solution and a rather easy one at that.  For the whole cockpit, all EL panels will be wired together with one transformer and be dimmable through a rheostat.  I wanted all of the instrument panel to match, so I’ll be spending some extra money on acrylic overlays for the entire panel rather than just smaller panels around the switches, but it’s my plane and I’ll do what I want to!  Wayne at Aircraft Engravers has been great and is pretty excited at this working so well, as he may be offering more panels like this in the future.

So now, I have finalized the lighting panels and overlay panels for production.  I’m hoping the avionics arrive on time at the end of February for me to finish wiring and installing.  With my higher level of customization, I’m not using the AFS quick panel switches so I’ll have a bit more work to do than most quick panel customers.  I’m very grateful to Rob, Stephan, and all of AFS for hanging in there with me on this over the top instrument panel.  In the end, I’m confident I’ll have a real show stopper that I’ll be admiring for decades to come.

Sit back and relax

After spending three months away from home and the build, I am happy to be back from my TDY and immediately got back to work on the project.  The time wasn’t completely wasted build-wise though, as I spent a lot of time researching, studying, and designing the remaining aspects of the build.  The biggest accomplishment was the finalization of my electrical schematic, specifically the power distribution.  I haven’t quite finished the final touches on the Visio product, however, the design is now on paper (digitally) and vetted through several external sets of eyes.  I’ll detail it more in a later post.

I also spent a lot of time talking with engine shops and builders.  I narrowed down all of my requirements to get quotes and solicited those out to several shops.  After lots of discussion, emails, and phone calls, I am really excited about what Aerosport Engines out of Canada has to offer.  They are one of only a few who can still get a new “kit” engine from Lycoming so all parts are brand new but not assembled.  That’s important to me since we’ll be adding SDS EFI and some other tid bits that would differ from a stock IO-540 without wasting money.  They also offer a build class that allows you to spend a weekend helping assemble your engine and learn a lot through the process.  I plan on turning it into a little vacation with my dad to build up our engine.

That’s plan A for the power plant.  Plan B is much more exciting but I’m keeping that one under wraps for a bit longer.

Back in the shop, a big morale booster is getting the rear seat back panels installed.  These were super simple to make with the panel and L angle.  The piano hinges were already cut as part of the floor / bulkhead and the backs fitting were a nice confirmation that I did it correctly way back when.  The seat backs show how roomy the 10 really is, not only in the passenger area but also behind them in the baggage area.  We are very excited about filling it all up with people, puppies, and packs for the adventures that lay ahead.

In other news…

Several months ago I made the difficult, but wise, decision to sell my propeller.  As beautiful as it looks hanging on the shop wall, I only purchased it because it was the exact prop I wanted and I got it at a good price.  The reality was it is due for an overhaul years before it ever turns on an engine and I could reallocate the funds better right now.  Comforting my decision was the fact I can purchase another prop, same design down to the paint, at any time.  It wasn’t something I had invested time or personalization in.  I’m happy that it will be on a finished project much sooner than I could have achieved and I didn’t lose any money on the whole thing.

On the project, I tackled the baggage door with relative ease, finishing it up in just a few evenings’ work.  It was an easy project and one that really gives a sense of accomplishment.  Several things to note, however, are to pay close attention to the hinge pin position and deciding if you want the door removable.  I purposefully positioned the hinge inboard to keep the protrusion subtle but in doing so, made it where the pin is not removable (or easily installed).  I realized this too late and had already drilled the holes.  Ed Krantz made his pins removable like the rear seat backs, but I decided that I just don’t have the need to remove the door and can live with the results.  I was luckily able to keep the hinge halves together and riveted to the door while slipping the whole assembly into the fuselage.  It turned out well and the door skin only needed a minor amount of finessing to lie flush with the fuse surround and produces a nice even gap all around.

Next up are the rear floor panels that fit very tightly.  When the plans say to put the manufactured head of the rivet on a certain side, they say it for a reason.  I had to wrestle the panels over two shop heads that would have been easier had I paid attention.  Van’s pays the builder to always think a few steps ahead and friendly reminds you if you don’t!  One change on the rear floor panels I made was to replace the AN470 rivets around the perimeter with LP4-3 rivets.  Bucking the AN470s was going to be a real pain and no doubt lead to issues with drilling a few out.  The front panels are all blind rivets, so I don’t think I’m breaking too many rules with this substitution.

Planes, trains, and trucks

Several months ago, I placed a rather expensive order with Van’s for one (1) RV-10 fuselage kit.  The process itself involved a lot of emails back and forth to a very helpful lady in OR to figure out any additions/deletions that I wanted to make to the kit.  It’s a very popular question, so here’s what I did:

Removed:

All windows and main windscreen (to be replaced by CE Bailey’s)

Rudder pedal components (dictated by Approach Engineering)

Instrument panel (using Aerosport)

I inquired about adding the doors into the fuse kit instead of the finishing kit but you get penalized for messing with a good thing and I figured I’ve got plenty to work on.

Now, this wouldn’t be a good story without drama.  The drama started by asking if I could ship the crate by UPS Freight and my company’s account which earns an incredible discount.  Van’s agreed but marked the BOL collect instead of 3rd Party.  This equaled a temporary bill of over $4000 from UPS.  Long story made short, I correct the first issue in short order and got the charges back down to a reasonable $233 including residential delivery.

Which brings up an interesting point.  Delivery.  Long way from OR to NC.  Lot of different ways to get here.  This is how our shipment did it.  Loaded onto a semi trailer which was then loaded onto a train car which then broke somewhere in Idaho without anyone knowing it meaning it got lost.  I discovered this for UPS on Wednesday while tracking the shipment online.  It said it was in OR on Wednesday and on time scheduled for delivery on Thursday.  Right.

A week later and some great help from a real live person who works for UPS in CLT, the crate showed up to our house and we pushed it in the garage.  Finally home safe and sound and thanks to a comprimise, all at a bargain freight charge of $100.


Decisions, Decisions

Over the past couple of weeks, I’ve done a lot of work on making decisions based on a lot of research and discussions. This might be a boring read, but I want to document my decisions for the build process and keep my own thoughts straight.

First the engine. It’s a big decision and complicated. I’ve decided to overhaul a used engine and do most of the work myself with the help of a few experienced professionals. There is a local guy who has built many engines for race planes and has a reputable engine shop that has offered to be a technical resource and allow me to use his facilities and equipment. While this won’t be for a while, our hours long conversation has reassured me of this approach vs. buying a new engine. He also advised me on which variants and the things to look for in a run-out or used core. So I’ll be keeping an eye out for good deals on eBay, Barnstormers, etc. over the coming year or so and hopefully make a purchase when the right opportunity comes along.

Building my own engine will also allow me to customize it with the options efficiently and cost effectively. I have committed to running the full EFII electronic ignition and fuel injection system. I like the ease of operation the system provides and most of all, the efficiency of the system. I will use the dual ECU option to provide redundancy for IFR operation. Combined with the Show Planes cowl, Flightline AC system, and possibly a horizontal induction pan, there will be some modifications required for sure. But this will be the airplane that I want and an efficient, modern platform.

It will also be heavily electrically dependant. I’m starting on the electrical schematic to include one main battery, one 70 amp alternator, one backup 30 amp alternator, and integrated back up batteries for the EFIS systems. Using the VPX Pro system will integrate my electrical loads with a few exceptions and provide a better insight into the health of the system.

More details to come on all of these decisions, but it paves the way for planning purposes and at least lets me get started on some of the systems side of the build.